Looking in the Rearview Mirror of 2023

I have posted multiple photos of quilts and projects in Instagram (@lifesloosethreads), but thought I needed a proper 2023 end-of-year blog post!

In 2023, I finished 7 quilts.

The first benefitted MD Anderson’s Ovarian Quilt Project. It is an online auction held every other year. The funds go to ovarian cancer research and education. This is my third quilt for MDA which honors the memory of my sister, Mary. My sister, Gretchen, made her first quilt for MDA’s project. The angel wing art quilt pattern is my own design. The quilt measures 44″ wide by 49″ long. Since teal is the color designated for ovarian cancer, one of the feather layers is teal. The others are yellow, purple, and orange. Expertly quilted by Lisa Taylor and awesome quilt label by Sally Wasserman.

The second quilt is a Quilt of Valor given to a local World War II veteran in August. The quilt kit is entitled “For the Brave” by Patti’s Patchwork and measures 72″ long by 58″ wide. As I was constructing the quilt top, I kept telling myself this was the only Quilt of Valor I would ever make in my life. The kit had some challenging blocks and I was just over it. However, when months later, I placed the quilt over the shoulders of my veteran, I changed my mind. I’m already thinking about my quilt for 2024. It was quilted by Lisa Taylor.

I am not certain when I started quilt number three! Maybe at the beginning of 2022. I worked on it at several quilt retreats and got lots of fun poked in my direction. And rightly so! The complex little blocks (each 4 inches square) took up very little space on my designated very large design wall. The quilt is entitled “I Spy 96.” The adorable paper-pieced I Spy quilt pattern is by Kimmie Tanner and Missy Winona. It is 43″ wide by 60″ long and contains 96 of the 100 quilt blocks in the book. I have a specific wall for the finished quilt. My least favorite block was the teapot with 41 fabric pieces. Judy Mathis used a swirly quilting design and the label was made by Sally Wasserman. I used Kona solids and mixed in batiks for the images and various white solids for the background. The backing is by Wilmington entitled “School is Cool” by Nancy Mink.

Quilt four is a baby quilt entitled “For Baby Calvert” for my friend’s first grandchild! I used a Moda panel called “Farm Charm” by Gingiber and sashed the blocks. Love the black sheep! The backing is from the same collection but with small sheep. It was quilted by the lovely Val Payne and label by Sally Wasserman.

Quilt five is “The Little Ghost” from a pattern/kit by Leslee Price with multiple blue and cream blocks and appliqued eyes and mouth. It is 45″ wide by 50″ long. It is quilted by Val Payne and label by Sally Wasserman. The quilt goes with the children’s book “The Little Ghost Who Was a Quilt” by Riel Nason. I am thinking about donating this quilt/book to a charity next fall.

Quilt six is a Minecraft wall hanging quilt for my grandson, Jacob. The pattern is by My Rainy Day Designs. I made nine 12″ blocks and Jacob picked his favorite Minecraft characters: dirt, sheep, chicken, creeper, mooshroom, pig slime, and zombie. I have no idea what Minecraft is all about but that is okay! I used a fusible 2-inch Quilt Fuse grid for fabric placement. Jacob and Ben helped with the layout of several of the blocks. The finished blocks are sashed with finished 2-inch black borders. The backing is Benartex’s “botanica” by Amanda Murphy. It was quilted by Val Payne.

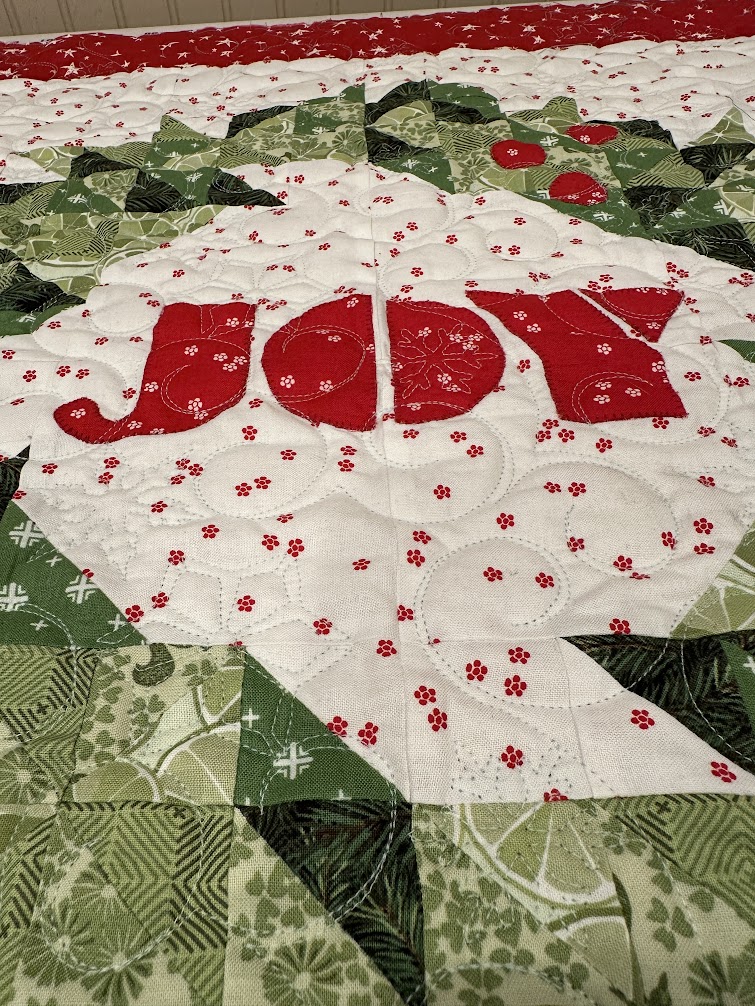
Quilt seven is a 30″ by 30″ small quilt from Jillily Studio entitled “Joy Wreath.” I purchased the kit/pattern (included fabric for the top, back and binding) at this year’s International Quilt Festival. It was a fun little project that came together quickly. It was quilted by Val Payne with a snowflake panto.

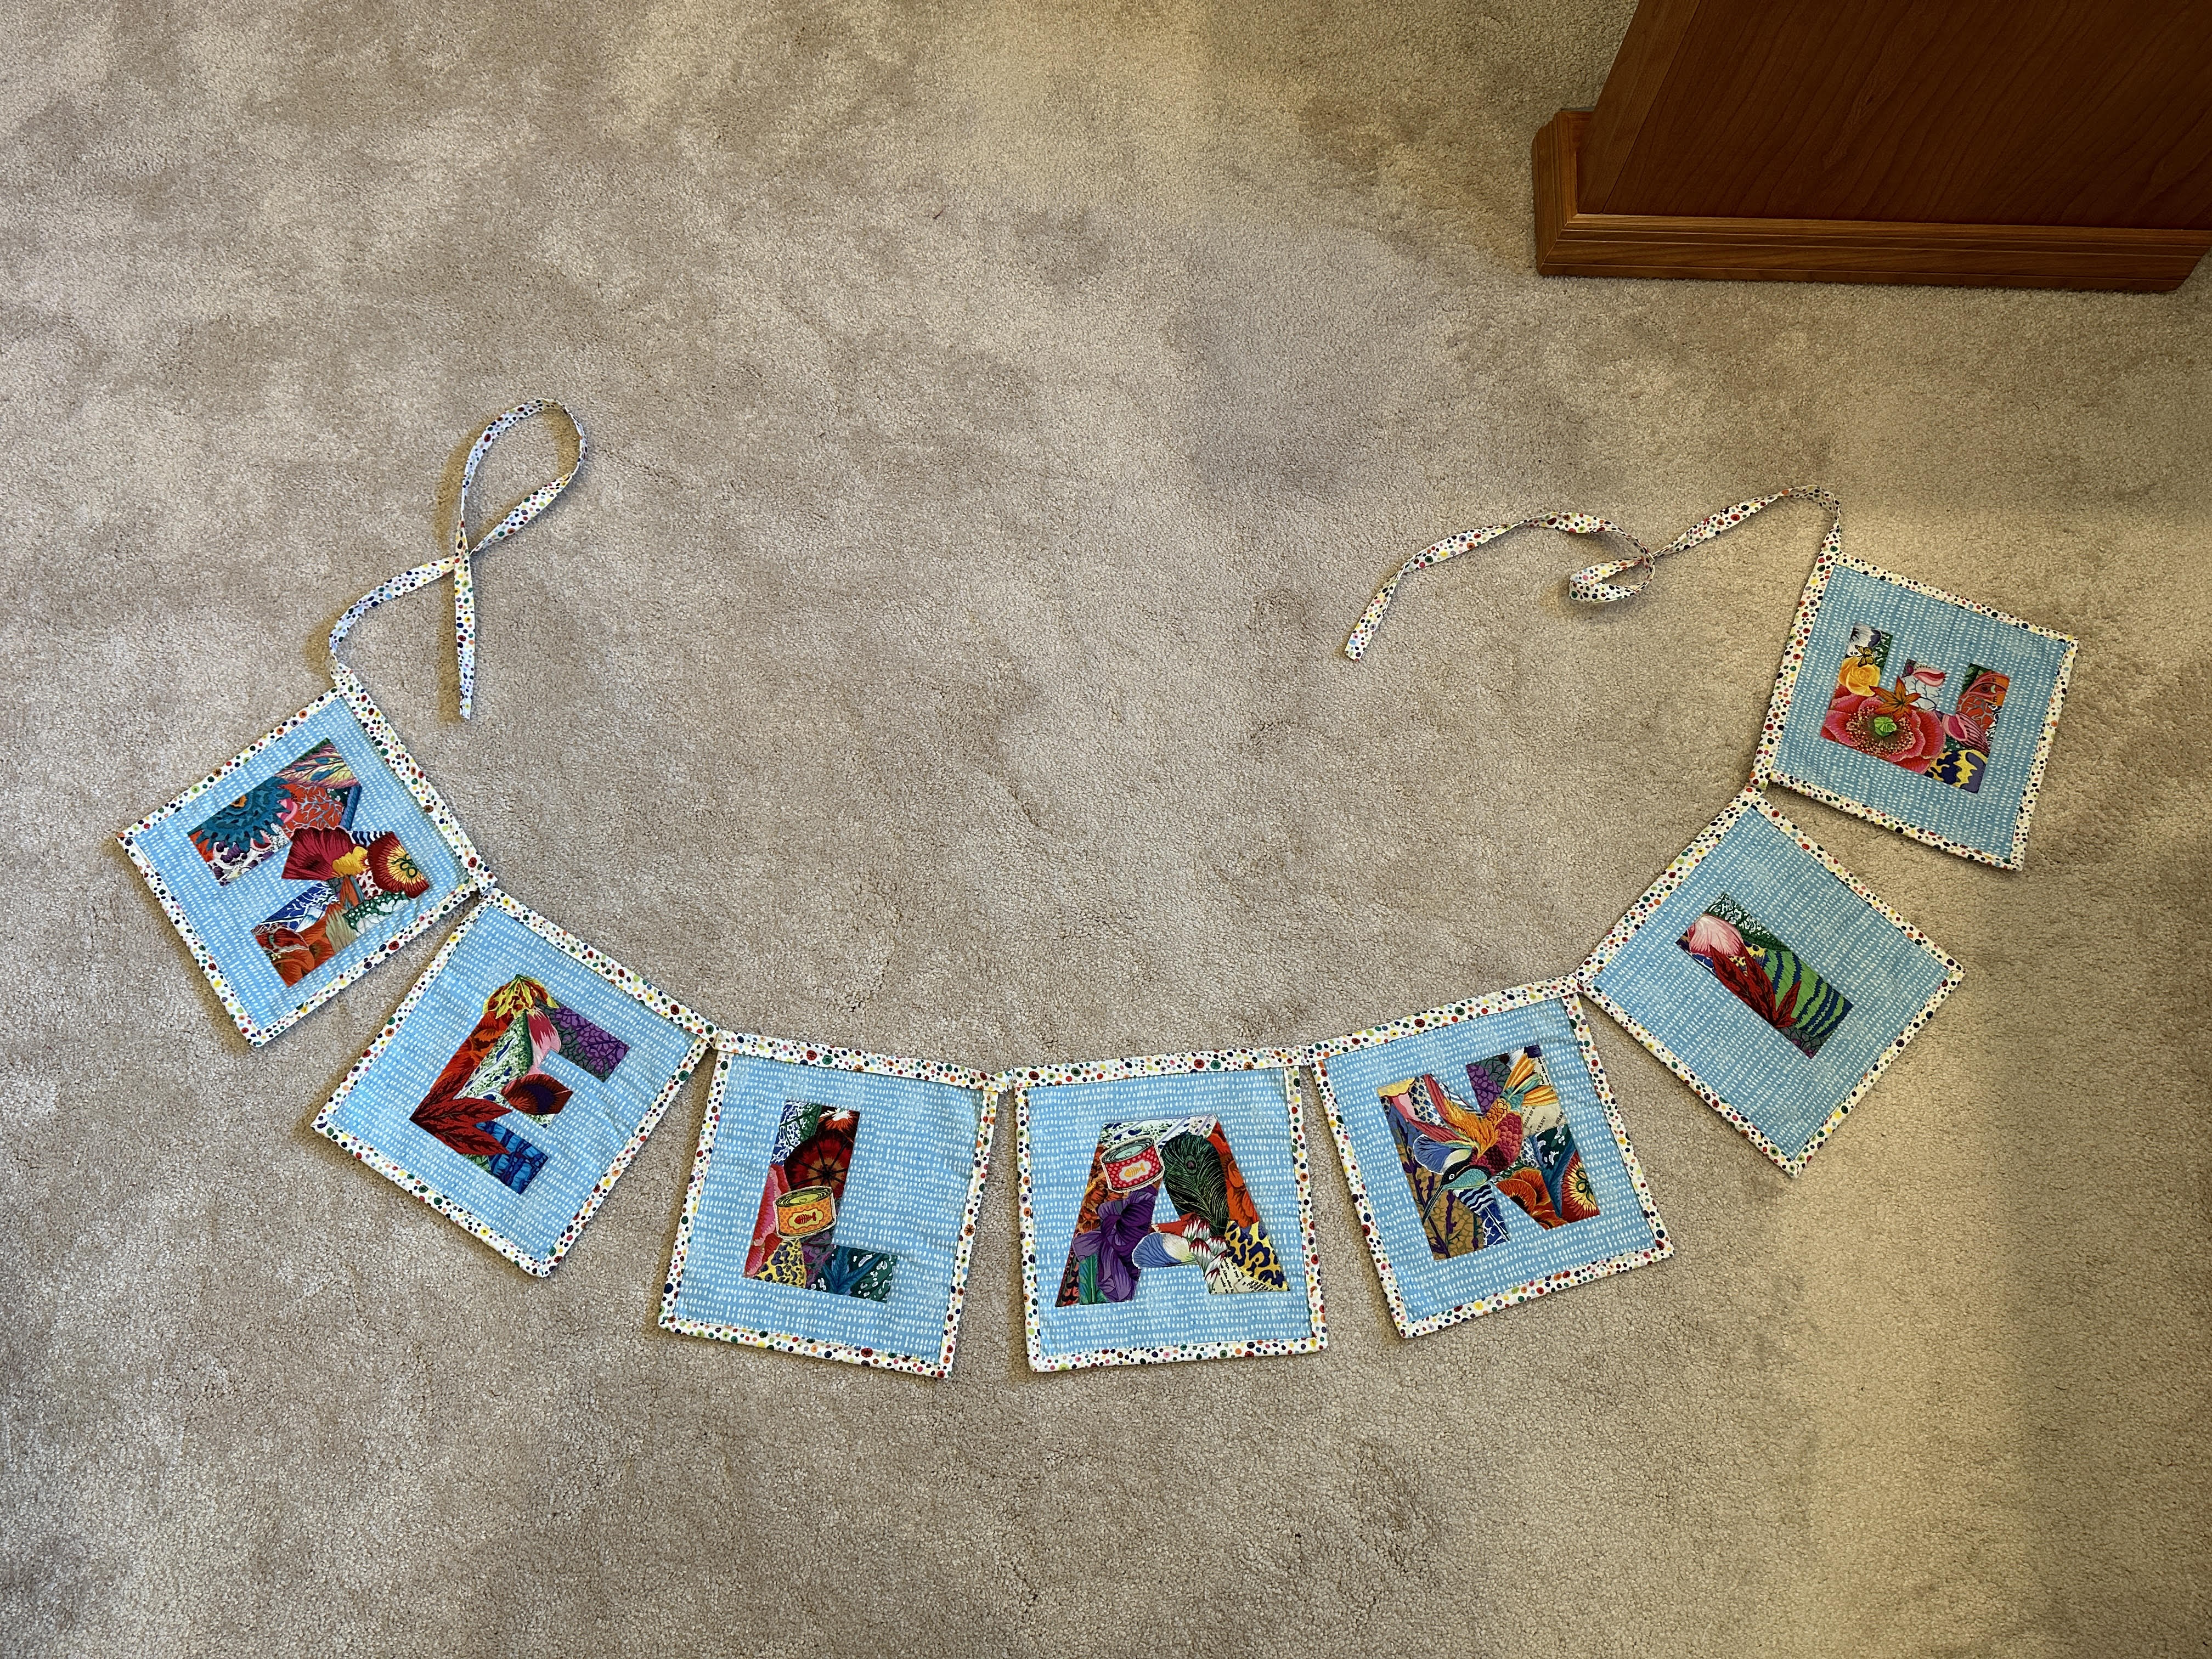
There were several quilt-related projects in 2023, which included: a collaged banner with granddaughter Melanie’s name, a University of Alabama pillow for my favorite neighbor’s awesome son, barn quilt (it was a super fun class), and participation in our guild’s 2024 paper-pieced raffle quilt.

Trudi the Collage Art Quilt Reindeer – all quilted


Trudi, the Collage Art Quilt Reindeer, has been back from the longarm quilter, A Needle and Thread, for some time and I just realized I haven’t blogged about the finished product! I guess I’ve been busy creating the next collage pattern! Trudi’s quilting is custom with the lovely Erica catching lots of the flower motif edges. She also enhanced lots of the areas to make them puff out. The outside edge of Trudi is also outlined. Finally, Erica quilted an “all over” pattern in the navy background. I used a marbled deep red for the binding and made a hanging sleeve for the back.

I love hanging my quilts and auditioned Trudi in my sewing room. Ultimately, I decided Trudi was meant to hang out in our entry foyer. What do you think?

Next week, I will be launching my next pattern just in time for rodeo season in Texas!

If you wish to purchase any of my patterns head on over to my Etsy Shop. Domestic shipping is free.

Trudi the collage art reindeer – auditioning the background and gluing down!


So far you have learned so much about collage quilting from my previous posts about Trudi. I wanted to take you from the beginning to the end of a collage art project. This post is about auditioning the background and gluing the collaged Trudi to the background fabric. I will save the post about the longarm quilting for later.

After finishing collaging Trudi, I cut away the pattern ease to reveal just the reindeer image. Trudi and I then took a little trip down to a local quilt shop to figure out a background fabric. I wasn’t going to repeat a mistake I made on my very first collage and purchase fabric before I had the collage finished. Getting stuck with over a yard of fabric you probably won’t use is not a happy thought.

So for Trudi, I knew I wanted a bright batik to really make her pop off the quilt. One of the lovely ladies that works at the quilt shop helped me pull fabric bolts down and lay Trudi across. I really liked the brightness of the lighter blue … but the reindeer didn’t pop. When I laid Trudi on the navy batik, we knew we had a winner! The lesson here is don’t rush when it comes to purchasing the background fabric. It can really enhance your collage art quilt.

After ironing the navy batik, I was ready to glue the collage onto the backing. This is so simple. I lay the batik, right side up, on the foam core board (the glue can bleed through a little and you don’t want glue all over your kitchen table). Place Trudi exactly where you want her on the background and keep her in that position. I use FabricFuse, a quick bonding fabric adhesive. There are several on the market. Place a thin line of glue around the entire outer back-edge of the collage and lift, for instance, one of the antlers … glue … then carefully lay the antler back down on the background. Repeat until you have the entire edge of your collage glued down. Follow the pressing/drying directions of the glue and you are finished with your collage art quilt top.

If you wish to purchase my original Trudi the collage art reindeer full-size pattern with step-by-step directions, visit my Etsy shop. Free domestic shipping is still available but for a limited time.

Trudi the collage art reindeer – a lesson in building your collage


Last week I wrote about building Trudi’s antlers and the method behind all the fun with little pieces of fused fabric.

Since then I have been Christmas shopping with my lovely daughter. Rice Village, a popular Houston shopping area, had an adorable reindeer just hanging out. I had to get a picture.

So this week let’s talk about some of the other areas on Trudi. It is instructive to see how an collage quilt comes together.

First, the Trudi’s eye gave me some issues. The eye originally chosen was a light brown fabric. It had a swirl in it that could suggest an eye. I knew Trudi’s face and ears were reserved for this beautiful medium blue/purple flower. Once the face was built, I placed the light brown eye. Unfortunately, it was totally lost in all that blue/purple. I struggled with different colors, but finally layered three fabrics. First white, then black and finally a pink center flower. Playing with the colors really paid off.

Next, I turned my attention to Trudi’s neck area. I knew the neck should be lighter in color and chose a cream with a hint of blue flower. I played with a thin red fabric to divide the neck from the body but didn’t like that at all. That red went in the trash. Once I had the neck covered with just the cream flowers, I still wasn’t happy. The flowers by themselves was too much. But by simply adding a few darker small flower motifs throughout the neck, it looked more interesting.

One of Trudi’s front legs was my biggest challenges. I interpreted the way Trudi’s two front legs are positioned on the pattern as a front and back leg. Actually, they are both FRONT legs. Note the mostly purple front leg. I kept looking at it until finally it came to me that it really was a front leg. I finally took off the purple motifs and built that leg much like the other front leg with red flowers. Instant harmony!

So I guess your takeaway from this blog post is to play around with the motifs. Experiment if something doesn’t feel right. Don’t be afraid to take a whole section of motifs off and start over. Add motifs to a section that looks plain or bland. Be bold.

Next week, I will show you how to audition a background fabric for Trudi. The background can totally change your collage quilt. I will also talk briefly about gluing Trudi onto the background and color options for binding.

As always, if you are interested in purchasing my Trudi full-size pattern and step-by-step instructions check out my Etsy shop. Free domestic shipping is still available but not for long.

Trudi the collage art reindeer – a lesson in getting started with the antlers!


Creating a collage art quilt is easier than you think. Just break the process down into little bites. If you need to review how to fuse, check out one of my previous blogs for new collage quilters on fusing. The link is provided here.

On this blog, I also have created several other blogs posts with lots of other tips, tricks and lessons on how to put together a collage art quilt.

With Trudi the Reindeer, I started with the most difficult area first … the antlers. All those little narrow areas and curves were going to take some time to cover properly with fused fabric. I already knew I wanted to use Philip Jacobs’ Orchid line of fabric in several different colorways. I previously used his fabric for Moo-Shu on the panda’s face and large body area. When figuring out the “look” for Trudi, I spent some time searching around the web just looking at fabric colors. I love the elegance of Kaffe Fassett and Philip Jacobs’ fabrics. But I could have just as easily chosen batiks, novelty or even thrown in a plaid or two. I discovered two additional Philip Jacobs orchid colorways that have brown and orange tones. These colors made Trudi’s antlers appear more woodsy-looking. I also mixed in the lighter orchid colorways to create interest.

After cutting out lots of motifs, I like to lay them out near where I am working. Then I start pinning them onto my line drawing drawn on the Pattern Ease-covered foam core board. I move the motifs around and pin them on until I like how they look. I cut larger motifs into smaller pieces if I need to.

When I have the antlers covered with fabric, I take each motif off, remove the paper backing, and place the motif back on the Trudi’s line drawing pattern. The motifs are tacky on the back, with the paper removed, and adhere gently to the Pattern Ease. When the entire Trudi line drawing is covered with motifs, a final fuse with a hot iron is finally performed and they will now be permanently fused.

If you are interested in purchasing my Trudi the Reindeer pattern, head over to my Etsy shop. The pattern includes full-size line drawn pattern, supply list and step-by-step directions. Domestic shipping is still free for a limited time.

Next week … I will talk about the challenges I had with Trudi and how I solved them!

Trudi, the collage art reindeer is coming to town


Need a Christmas quilting project to get into the Christmas spirit? Or perhaps you have a quilt lover on your list? While Rudolph is still getting into tip-top shape for the big day, his lovely cousin, Trudi was posing for the above quilt! With that being said … Trudi, my collage art reindeer pattern, is being launched today on Etsy. And yes … girl reindeer have antlers. At least that is what Google told me.

Head over to my Etsy shop and check out how you can purchase this full-size pattern with complete pattern directions and supply list. The quilt size is 42 inches wide by 56 inches high. And did I mention domestic shipping is free for a limited time?

Next week I will post more photos and directions on how to make this collage art quilt.

Click her for Etsy shop link

The Snowflake Quilt

This year, while struggling to keep up with those challenging block-of-the-month blocks, I also completed a quilt for The Village Learning Center’s fall gala. It is their big fundraiser for the year. Unfortunately, when Hurricane Harvey hit in September, it didn’t seem like a gala would be a good idea. There are so many people and businesses that were hurt in our area. So instead, they are holding a “non-event.” The silent and live auctions are being held online this week. I have bid my own quilt up twice. It is my hope they make a bunch of money on this “non-event.” Their amazing day center is a wonderful place where over 100 adults with developmental disabilities enjoy activities like bowling, arts and crafts, exercise and so much more. It is such a blessing to so many and a huge part of Mimi’s life!

This is the first time I have been called by the Village with a special request. They wanted a large lap-sized “snowflake” type quilt. They were originally going to combine it with other things in a silent auction package. So when the hurricane messed things up they decided to let the quilt stand on its own. Fortunately, I have always loved Christmas-themed fabric and seen it as my duty to contribute them to my stash each year. Well, somebody has to do it! Darn if I even had some fabric with snowflakes. I did have to go shopping in July for some additional Christmas “snowflake” fabric which was a little daunting.

The pattern is from American Patchwork & Quilting Magazine, issue August, 2009. The blocks are all 5-inch squares using white/cream Christmas 1-1/2″ strips for half of the blocks (the Rail Fence squares) and red Christmas/snowflake fabric for the block with the four triangles. Top Stitch Quilting professionally machine quilted the quilt with a large “snowflake” all-over pattern. The patch on the back was embroidered by Personalize-It in Kingwood (this business flooded during Harvey and I am hoping Tracey and her business will return to us).

St. Martha Quilters create quilt for Fall Festival live auction!

Martha’s Quilters have been busy for months getting ready for this year’s St. Martha Catholic Church Festival & Market which will be held on Saturday, October 8. As always, our booth will have for sale some really unique handcrafted items such as Christmas gifts, lots of fun college items, baby wearables, table runners, adorable doll quilts, beautiful lap-size quilts and lots of items I haven’t even seen yet. Basically, something for everyone! Just be sure and stop by our booth! You won’t be disappointed!

Our prayer quilt ministry group has again made a one-of-a-kind quilt for the live auction. Each of our members participated in making this quilt another masterpiece! Last year our Nativity quilt sold for $2,200.

This year’s quilt is an adaption of a paper-pieced pattern called “First Snow” by Tina Curran. Lynn, one of our lovely and talented Martha’s Quilters, acquired the pattern a couple of years ago and promptly began collecting fabric for the project. A couple of months ago, I remember seeing Lynn hunkered down at her sewing machine with little pieces of colorful Christmas fabric flying all over the place. I thought she was making the whole quilt by herself. It wasn’t long before Judy, who sat next to Lynn most Wednesdays, was making blocks for the project. Lynn even taught Judy to paper-piece. Judy also designed the church block, which is not a part of Tina Curran’s design, but definitely just what our Festival quilt needed! I think Clara made some blocks as well. Several of our talented ladies … Noreen … Clara … and Sally come to mind … machine-quilted the project. I was privileged to sew the binding on … and Marie sewed the binding by hand to the back. Embellishments are next week. This quilt is stunning!

The three-month project took our members hundreds of hours to complete and will be hanging in the narthex at St. Martha’s Catholic Church the weekend before the festival. Feel free to take a peek! Opening bid for this live auction one-of-a-kind Christmas quilt is $500.

Santa Baby quilt

I finally finished my “Santa Baby” quilt!!! I purchased the book and kit during the 2013 Quilt Festival from The Buggy Barn. Their book is entitled “Positively Crazy.” The kit made up 16 Santa blocks. When all was said and done, I choose nine for a smaller wall hanging. The original quilt with all 16 blocks is 84″ X 84″ and just too large for my purposes. I still have three finished blocks that will eventually be turned into a table runner. Three of the blocks turned out mediocre so you can imagine where they are now residing.

I have to say this was the most challenging quilt I ever made. I should have read the directions three times before starting instead of two. The basic premise is stacking 16 layers of fabric (lights and darks), ironing a template on top of the layers, and cutting the layers with a mega-large rotary cutter. It was a little challenging with so many layers and pieces. My biceps are a tad larger after the cutting process! The sewing was fun, but I had trouble with things like getting Santa’s boots to not be pointy, tree trunks a little too thin to my liking, etc.

After the top was finished, I headed over to consult with Kim Norton, owner of A Busy Bobbin. We talked about custom quilting and I totally let her take over with design and thread choices.

I love what Kim did with the quilt!


After sewing on the binding, the identifying patch on the back and the sleeve it was finally ready to hang! What do you think?